
That would be, keep your big fat fingers off the first surface mirrors.
I buy a fair number of old optical instruments related to topography, surveying and navigation for my collection. Everything from Brunton pocket transits to theodolites to sextants. The majority of these instruments rely on first surface mirrors to establish a precise optical path. A first surface mirror, or front surface mirror, is a mirror where the reflective coating (silvering) is applied on top of the glass instead of behind the glass as on standard surface mirrors.

First surface mirrors provide a clearer and more precise light path vs. standard surface mirrors, and eliminate the ‘ghosting’ issue seen when using standard mirrors
When I was going through the Defense Mapping School for various courses in the 1980s I got training on systems like the Analytical Photogrammetric Positioning System (APPS). The APPS consisted of a large stereosope connected to an X-Y controller and an early desktop computer. The APPS used large first surface mirrors to provide a highly precise view of specially processed film positive stereo images. The georeferenced images allowed the operator to determine the precise location (x, y & z) of features in the images – road intersections, bridges, buildings, runways, etc. In its time the APPS was a revolutionary system, and it relied on first surface mirrors to bring the stereo images to the operators eyes.

The APPS in use
Whatever we were being trained on, whether it was the APPS, or reflecting stereoscopes, or any instrument that used first surface mirrors the instructors warned us repeatedly – “keep your big fat fingers away from the first surface mirrors!” And for good reason. Because the reflective coating is placed on top of the glass the reflective surface is unprotected and exposed to the elements. The oil and sweat in the human hand contains acids that can permanently etch these exposed reflective surfaces. Even things like the tar and nicotine from cigarette smoke, the oil mist from small pumps and motors, and a whole host of other environmental pollutants will attack the reflective surface of these mirrors. Their only defense is the care exercised by the user.
Whenever I check out at an instrument like a stereoscope to add to my collection the first thing I look at is the mirrors. The condition of the mirrors is a direct indication of the care the instrument has received and the conditions it was stored under. Dirty and/or tarnished mirrors usually indicate the instrument was not well cared for or stored properly. If the mirrors are in bad shape it’s a good bet that the other components, like the optics, are in bad shape too. Bad mirrors = a significantly lower offering price. The reason is simple – first surface mirrors are hard to get and expensive. A new set of primary mirrors for a stereoscope can easily exceed $100. If someone is asking a couple of hundred dollars for a stereoscope you don’t want to be putting another hundred bucks or so into a new set of mirrors.
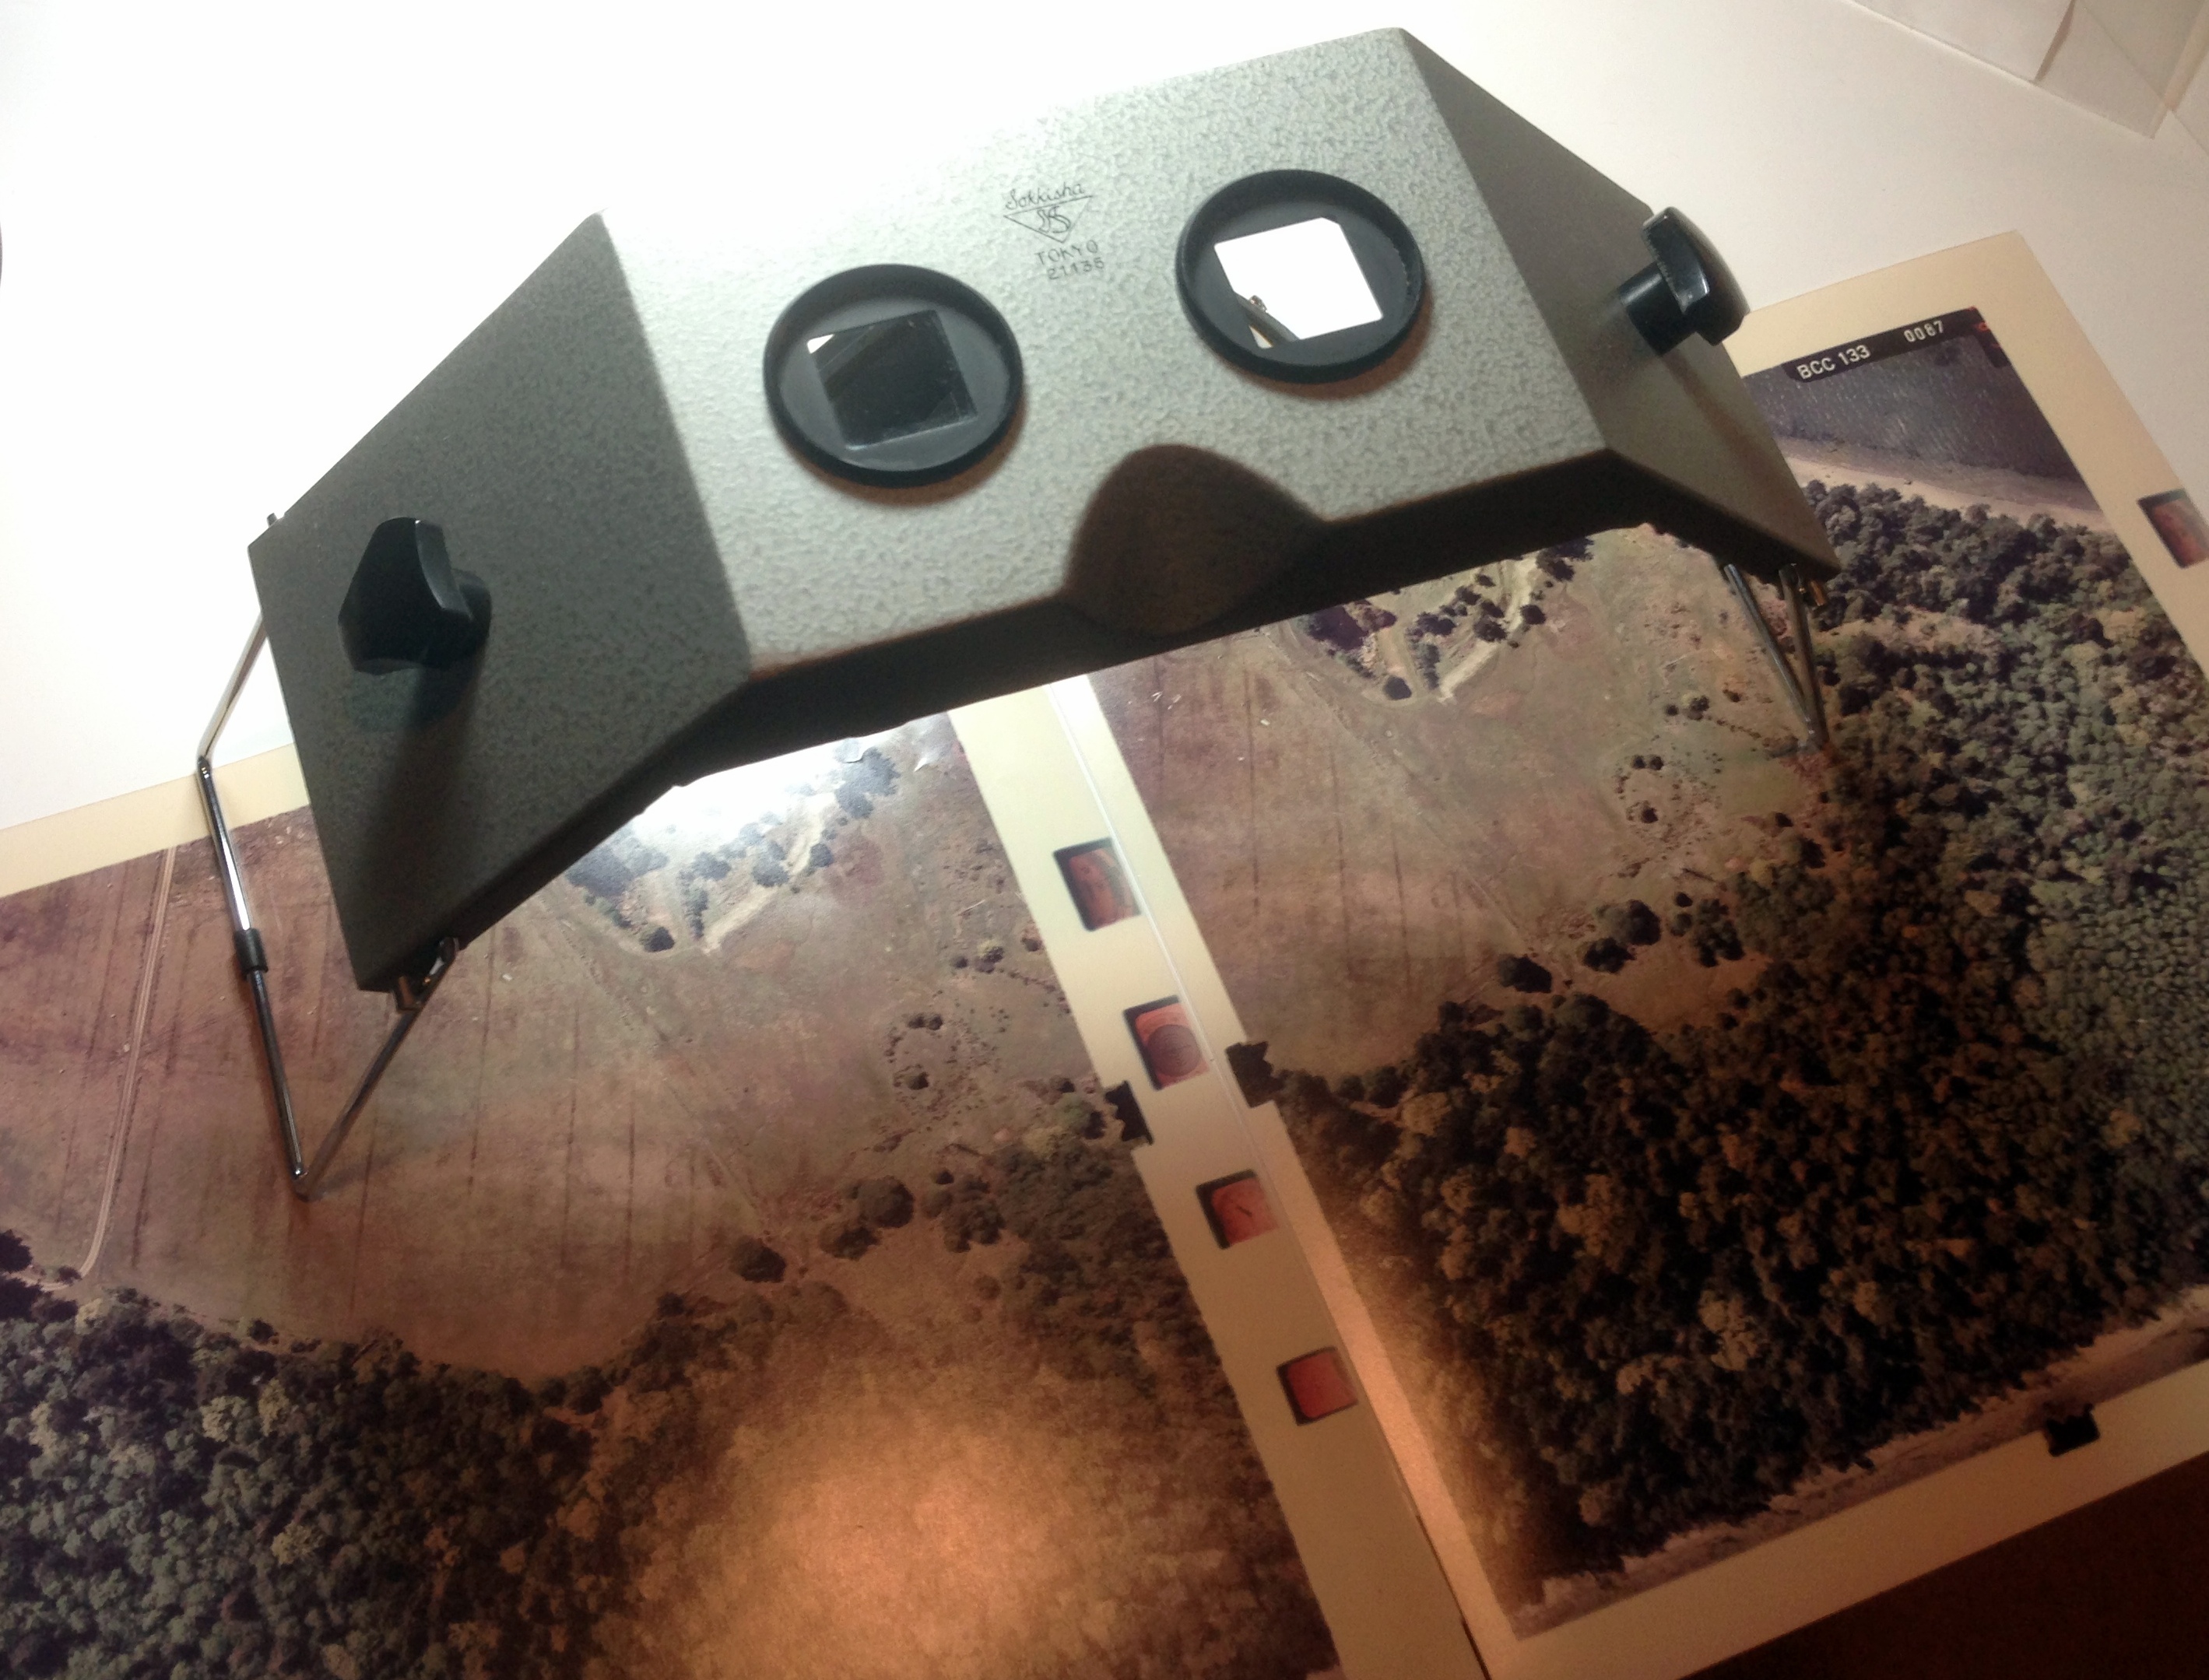
But sometimes the asking price is so good that you take a chance, and that’s what I did with the stereoscope we’ll take a look at today. Several months back I spotted a nice little Sokkisha MS-16 stereoscope for sale on eBay.

The seller did a good job of photographing the stereoscope from a number of perspectives, including a clear shot of the primary mirrors. Overall the instrument looked like it was in very good condition. I tossed out a low bid and was surprised when I won. When the stereoscope arrived I gave it a quick inspection and was pleased to see it really was in good condition, including the primary mirrors.
I slid a set of stereo images underneath for a check of the optics and immediately noted that the right side was a little cloudy. At first I suspected a dirty lens, but further investigation revealed that one of the small secondary mirrors was ‘dirty’. A gentile swipe with some alcohol didn’t improve the situation so I removed the lens bridge for a closer look. I was disappointed to see that the right mirror wasn’t dirty, it was badly scratched. So bad, in fact, that much of the reflective coating had been scraped off of the glass backing. Because of the compact design of this stereoscope it’s difficult to imagine how this mirror got damaged. Somebody had to stick a finger up into a place that’s hard to reach and rub, rub, rub.

Note the ‘smudge’ seen in the right eyepiece – that’s actually the coating scraped off of the secondary mirror
In any other situation I would have contacted the seller and shipped the instrument back for a refund. However, this stereoscope was in overall great shape and the only issue was this one small mirror. Since I didn’t have a whole lot of money invested in it I figured I’d have some replacement mirrors made.
The first thing to do was to get the damaged mirror out and measure it. With a stereoscope of this design it’s an easy job:

Just remove the two screws holding the mirror bridge in place…
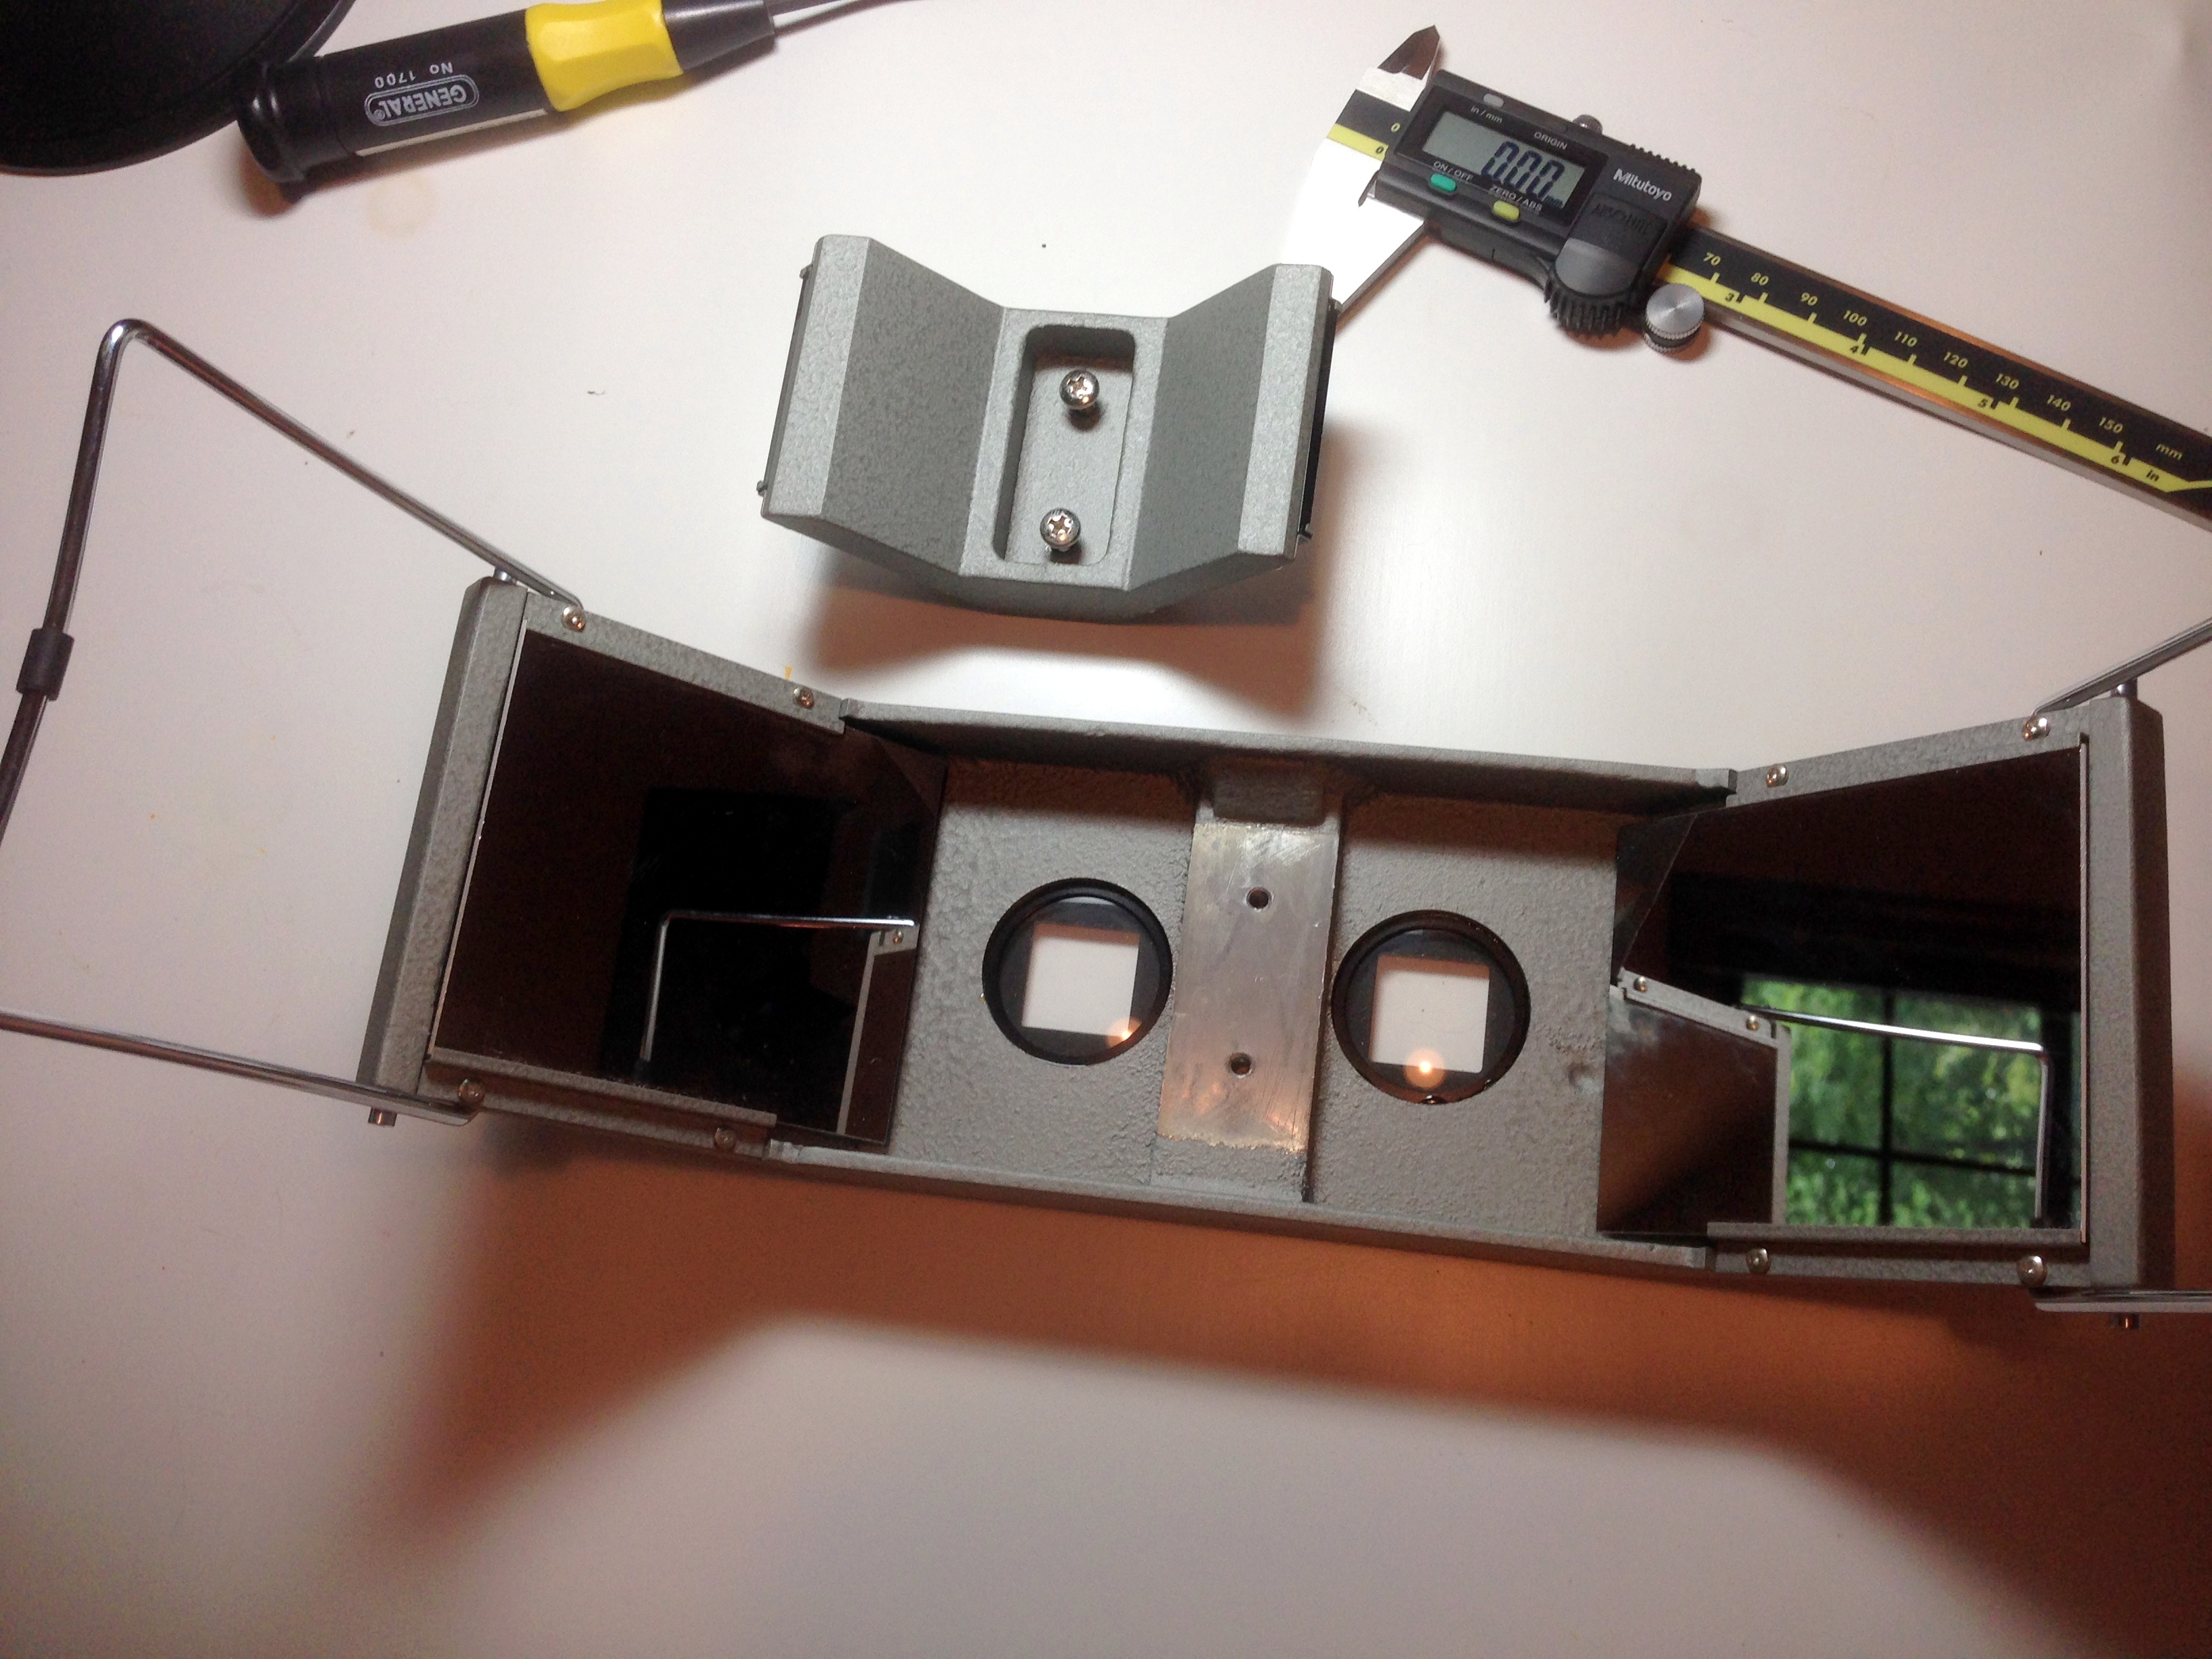
And off it comes

A quick shot of the mirror while still mounted on the bridge shows the damage (that’s my iPhone seen in the reflection)
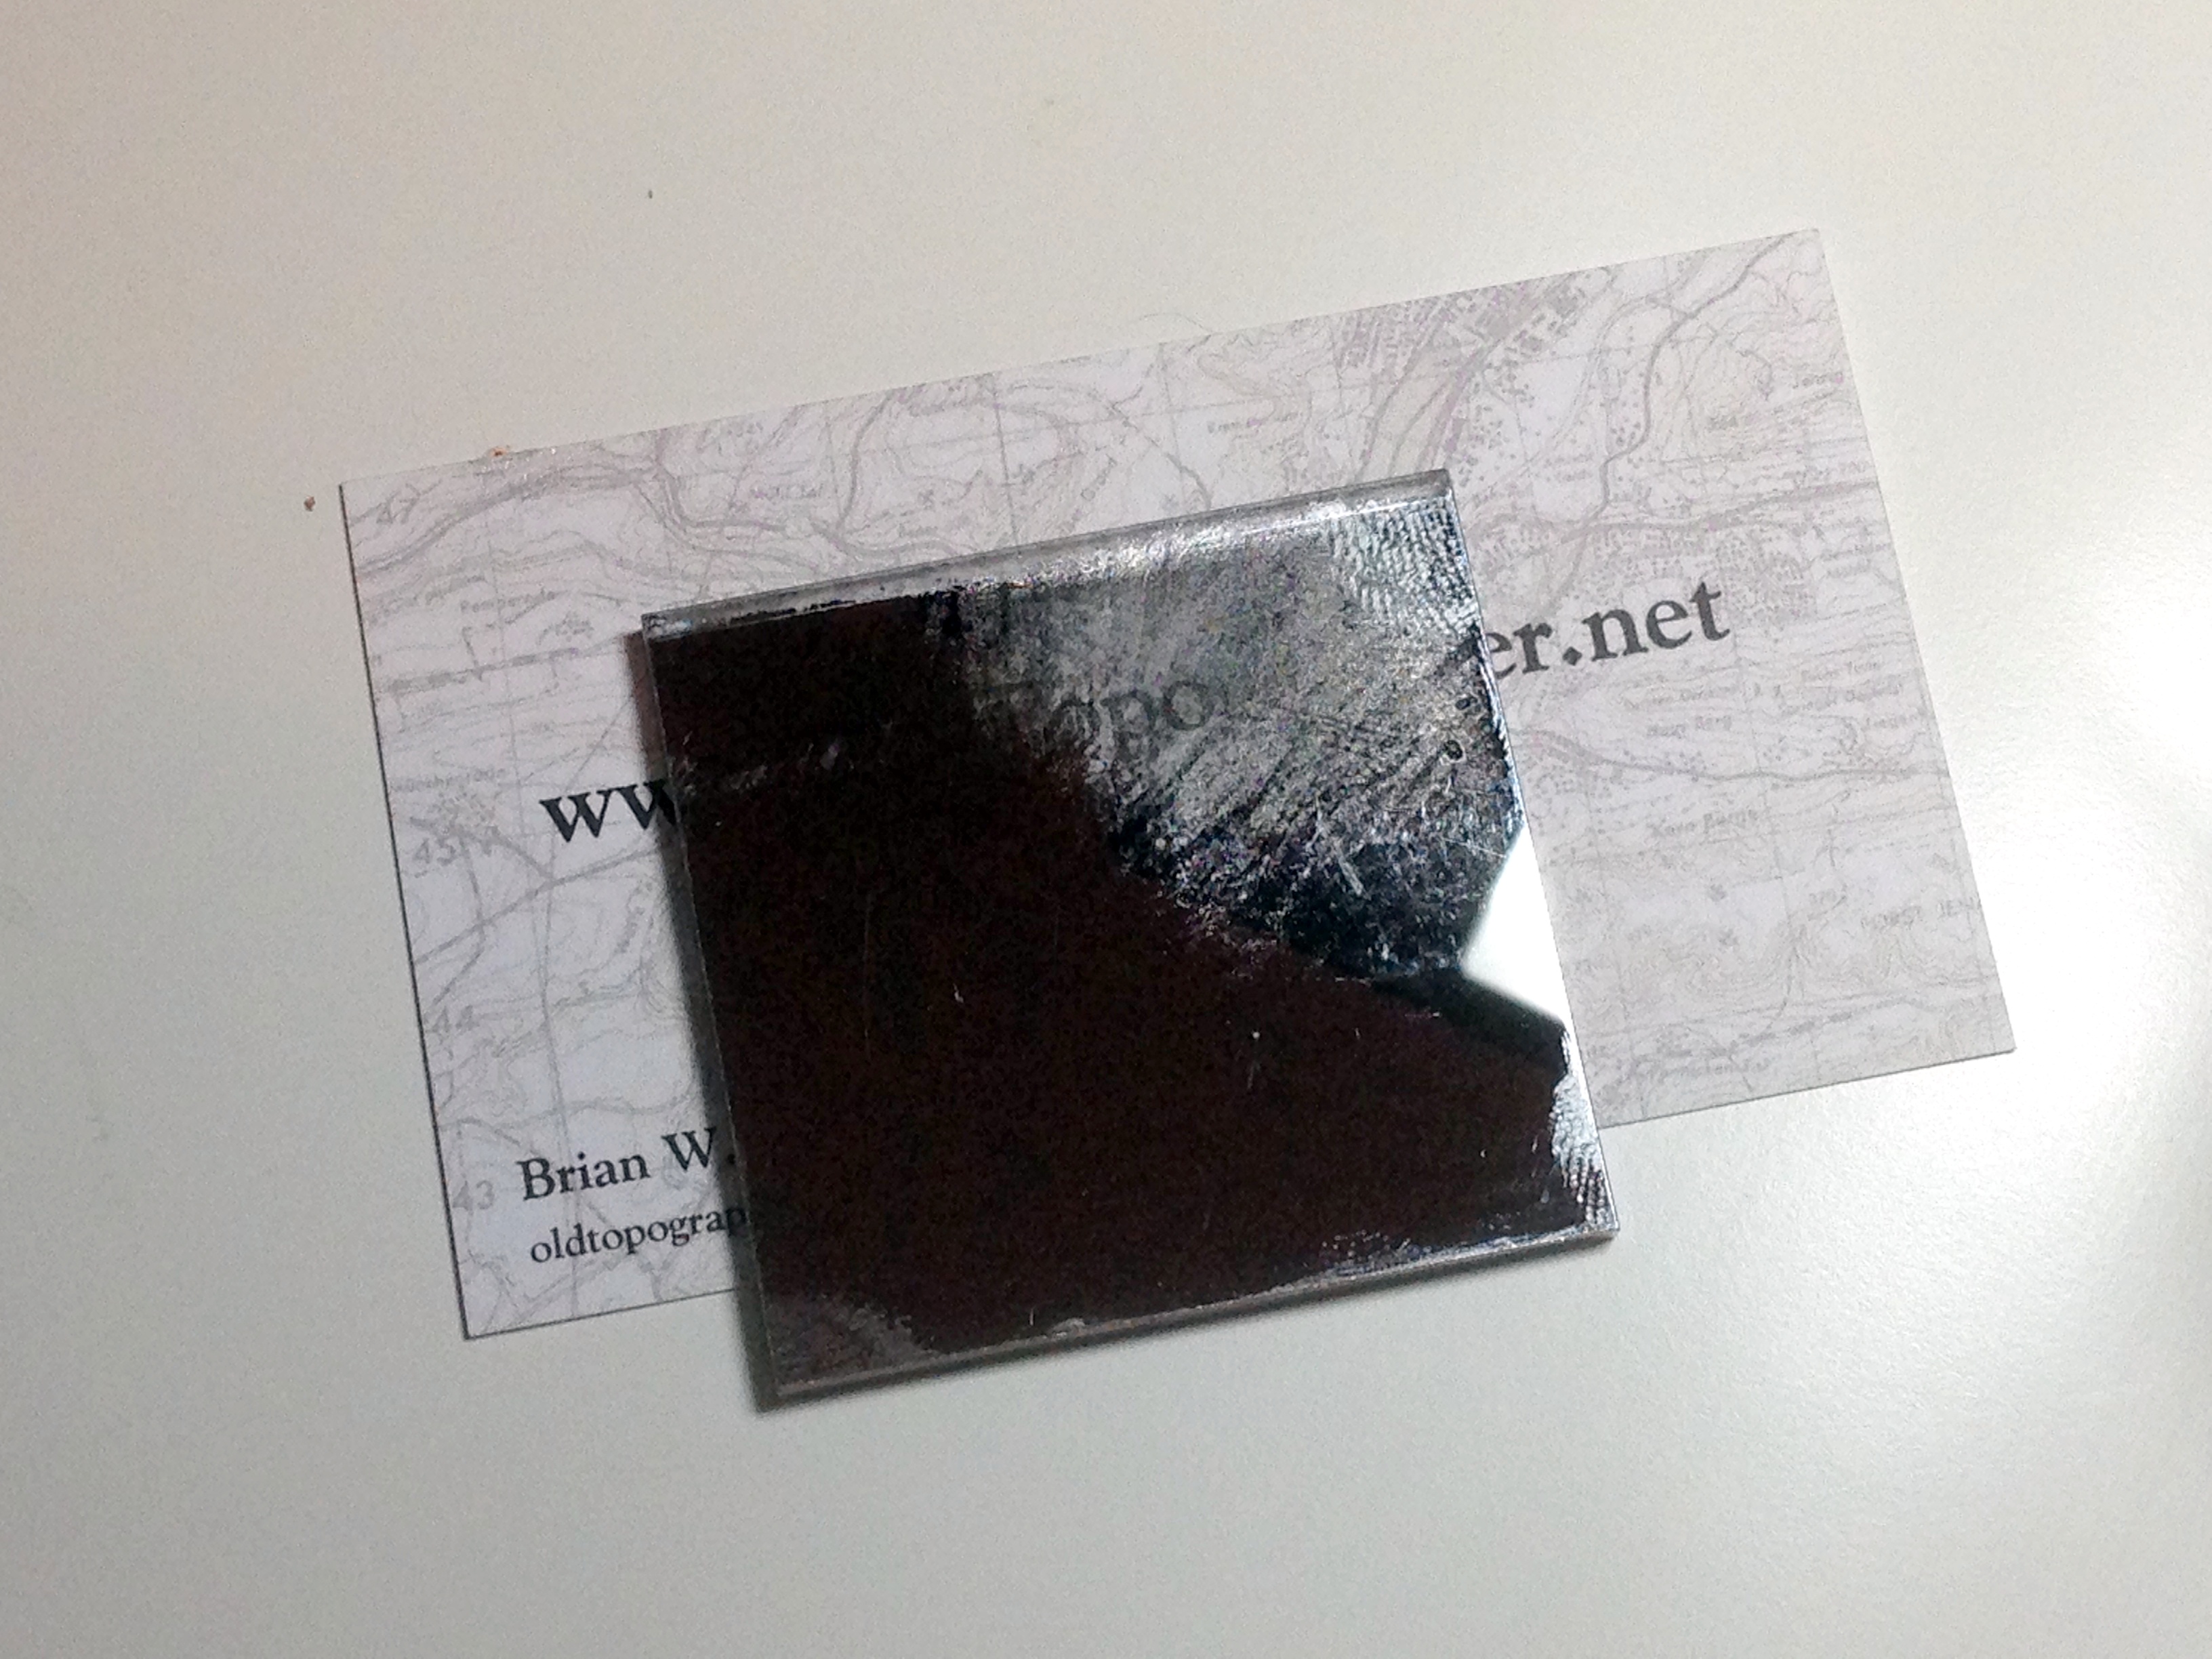
With the mirror out of the bridge we can clearly see the extent of the damage. Somebody went at the mirror with something abrasive!
Careful measurement of the mirror showed that it’s 46 mm wide x 48 mm long and 3 mm thick. Next it was off to FirstSurfaceMirror.com, an on-line vendor of custom sized glass and acrylic backed first surface mirrors. A single replacement mirror would have cost me $20, but I decided to replace the pair. Buy two mirrors of the same size on the same order and you get a 15% discount on the second mirror. Two mirrors for a total of $36. Not bad.
Within a week of placing the order the new mirrors were sitting in my mail box. A quick check of the dimensions shows that FirstSurfaceMirror.com did a good job with the width and length, but the thickness was just a bit off – 3.2mm (1/8″) vs. the requested 3mm, but considering they are using standard US glass it is a discrepancy I can live with as long as the new glass goes into place properly.

The new mirrors from FirstSurfaceMirror.com came carefully wrapped in bubble packing and individually sealed in polyvinyl pouches

Time to gather up all the bits ‘n pieces and get this thing back together

The new mirror mounted in place just fine. The added thickness didn’t cause any issues. While I had the mirror bridge off I decided to clean all the mirrors. I like the Zeiss lens cleaning wipes sold at retailers like Wal-Mart. Inexpensive and they do a good job
So with the mirrors and lenses all cleaned up and everything put back together it was time for a quick check for image clarity. I was thrilled to see that this neat little instrument delivers outstanding optical performance. The stereo image was crisp edge-to-edge. It’s amazing the detail that can be gleaned from a high resolution stereo image set and a well adjusted stereoscope with clean mirrors and lenses – the features quite literally jump right out at you. This little stereoscope delivers, and now it’s ready for another few decades of use!
 A couple of observations on collecting, cleaning and maintaining optical instruments like stereoscopes:
- Mirrors do go bad with age, particularly those used in WWII-era instruments. The silvering begins to tarnish or fungus gets a foothold on the glass surface and begins to etch the surface as it grows. Even mirrors stored under ideal conditions will show the effects of simple aging. More modern (post-war) stereoscopes generally use mirrors that have a more durable aluminum reflective coating and seem to be less prone to tarnishing and other damage.
- Generally speaking, unless the instrument has significant historical or other collector value (rarity) most optical instruments are not worth the investment to get them restored to full working condition. Take the Fairchild F-71 stereoscope I have in my collection as an example. It is a very common type of instrument that was manufactured by the thousands between 1942 and the 1960’s. Most F-71 stereoscopes offered for sale have seen long, hard use and have condition issues, mainly tarnished or damaged mirrors and dirty optics. If you are looking for a good working mirror stereoscope I recommend purchasing a more recent production model from one of the Japanese manufacturers. They offer excellent quality at fairly reasonable auction prices.
- Repair or cleaning of the interior of optical systems like the binocular heads found on many mirror stereoscopes is difficult and requires special tools. Disassembly and reassembly can be done, with some care, but re-collimating a set of binocular optics is extremely difficult without specific test equipment.
- Make sure you use the right cleaning materials and techniques. The old standbys, denatured alcohol, 100% cotton lint free cloths and a lens cleaning brush, are all you’ll need to do the job right. The new alcohol-free lens cleaning solutions sold in optical departments at places like Wal-Mart also work very well. Don’t use ammonia based cleaners like Windex. Start the cleaning process by gently wiping away loose dust using the lens cleaning brush. Then moisten a cloth with cleaning solution and using a light, gentle touch wipe down only those areas of the mirror that need cleaning (fingerprints, smudges, etc.). There’s usually no need to clean the entire mirror surface, just clean those areas that need it. Remember, less is best. Over-aggressive cleaning has ruined more optical instruments than neglect ever did.
- A set of properly fitting screwdrivers is important. One of the other things I check when evaluating instruments are the screw heads. I look for screw heads that show evidence of having been tampered with. If a screw head looks buggered up – a slotted screw head that’s been torn up or widened, or a phillips head that’s been rounded out by a poorly fitting screwdriver tip, all indicates that bubba’s been doing some repair/adjustment work on the item and more than likely messed something up.
- Make sure your work area is clean and well lit. Don’t do this kind of work on the same workbench you repair lawnmower engines on.
- And remember – keep your big, fat, greasy, sweaty fingertips off of the mirrors and optics! During the work on this stereoscope I wore latex gloves and immediately cleaned off any inadvertent marks or smudges using cleaners designed specifically for cleaning optics.
So what’s next? Just for fun I may try my hand at cleaning up my Fairchild F-71 using (cheaper) acrylic-backed mirrors instead of glass. Stay tuned!
– Brian

I remember using a Kelch Plotter in a topography/mapping course at Colorado School of Mines in the early 1960s. The plotter allowed x, y, (and z?) manipulations while moving a point stereoscoptically along stereo pair photographs.and tracing contour lines on paper, thus producing a topographic map. Although this was 50+ years ago I remember touching a circular disc on the plotter and removing the coating from it. I don’t know what the purpose of the disc was (mirror?) but the professor wasn’t happy. I learned later that the professor’s background was as a topographic engineer developing early photogrammetric procedures during World War II. (Remember in the early 1960s the war was a recent event and many of the professors were the age of our parents.)
Bill, it sounds like you were touching the round platen on the movable tracing table. The Kelsh didn’t use mirrors, it projected a pair of stereo images onto a work surface and using the small tracing table the operator traced out the features that were projected in 3D. There weren’t many Kelsh plotters made, and it’s neat that the school had one! You can see the USGS’s ‘user manual’ for the Kelsh Plotter at https://docs.google.com/file/d/0Bz0ZKN4l6fZfdThYOEMyV3oxazA/edit. Thanks!