I’m Always Going Somewhere

Time for a book review. In fact, this review is long overdue. I’ve mentioned before in this blog that the history of the Inter-American Geodetic Survey (IAGS) is poorly documented. As far as I know its parent agency, the US Army Corps of Engineers, has never published a comprehensive general history of the organization and its achievements. But then, the modern Corps of Engineers has never been particularly interested in celebrating its topographic history and lineage (yes, that’s a dig).

Earlier this year I was contacted by an IAGS alum, Paul Hauser, who was putting together a book on his personal experiences while working as a geodesist for the IAGS from 1968 to 1970. He was incorporating experiences from other IAGS alumni and contacted me for permission to use some of the material I’ve posted on this blog and website.

A few months ago Paul’s book was published and he graciously provided me a copy to read and review. The book, titled I’m Always Going Somewhere, is less a history of the IAGS than a collection of personal experiences that detail what it was like to work as part of the field parties that the IAGS deployed all across Central and South America. But in these stories you get a real sense of how the IAGS accomplished its mapping and surveying missions in some of the most remote (and dangerous) areas of the world and in an era before GPS, high resolution satellite imagery, smartphones, tablets, laptop computers and GIS software.

I'm Always Going Somewhere

Paul and his contributors Roald Bendixen and Carol Ann Skillern have put together a remarkable and important collection of their personal experiences while working in the IAGS. If you have any interest in the IAGS or the history of mapping and surveying I strongly encourage you to get a copy of this book.

My hope is that this book will encourage other IAGS alumni and the family members of alumni to come forward with their stories so we can start to build a more complete history of this fine agency.

I’m Always Going Somewhere is available from Amazon in both print and Kindle editions

Brian

Perrysburg Plat Map

As I’ve mentioned in earlier blog posts, you can find interesting map in the most unusual of places. Earlier this month I was up in northwestern Ohio visiting with my father and decided to take a few hours and check out the local history. I found myself in the delightful town of Perrysburg, right across the Maumee River from my hometown of Maumee. Perrysburg and Maumee ‘grew up’ together during the 1800’s and for much of their history were economic rivals, vying for the lucrative trade that moved up and down the river. In the end both lost out to Toledo, situated a few miles downriver where the Maumee empties into Lake Erie.

Perrysburg became what can best be described as bucolic, a sleepy little town that time and development passed by until one day about 40 years ago folks recognized that the town had a charm and a unique history unsullied by commercial development and tract housing. Suddenly Perrysburg became a trendy place to live and visit. The city worked hard to retain the unique flavor of the historic downtown, and they’ve done a great job.

The town was first established in 1812 on a bluff overlooking the Maumee River. In 1816 two US government General Land Office surveyors, Joseph Wampler and William Brookfield, laid out the town street pattern. Soon after the residents decided to change the town name to Perrysburgh to commemorate Commodore Oliver Hazard Perry’s victory over British naval forces at the Battle of Lake Erie at Put-In-Bay. The ‘h’ was eventually dropped from the Perrysburg town name at some point lost to history.

Perrysburg Plat Map

Wampler and Brookfield appear to be some of the first government surveyors sent into what was known as the Northwest Territory after the War of 1812 to conduct official land surveys using the Public Land Survey System otherwise known as the township & range layout.

The federal government was eager to get this land surveyed, platted and sold. At the time land sales were a major source of revenue for the cash strapped US treasury, plus the government wanted to encourage settlement in the area to solidify American claims to territory ceded by the British and Native Americans under the Treaty of Ghent which ended the War of 1812.

Both Wampler and Brookfield were very competent surveyors and there are records of their work in both the National Archives and the state archives of Indiana, Ohio and Michigan. Wampler is cited by several sources for his efforts in correcting the sloppy work of other surveyors, particularly his work to establish two initial points for the Michigan surveys. Brookfield seems to have headed west from Perrysburg and eventually became a surveyor and later circuit court judge in St. Joseph County, Indiana.

What we don’t know is what induced these two gentlemen to lay out, or plat, the town of Perrysburg. Platting towns and settlements was not something surveyors in the employ of the GLO (General Land Office) did. My guess is that Wampler and Brookfield got specific instructions from the GLO to execute the survey after the town’s leading citizens petitioned their representatives back in Washington, D.C. How rare was it to have GLO surveyors plat a town? Well, there’s only four cities or towns in the United States that were platted by surveyors directly employed by the federal government. Perrysburg is one, Washington D.C., Croghansville (Fremont) Ohio and Shawneetown in the Illinois Territory are the others.

1816 Perrysburg Ohio Plat Map

The notation in the lower right corner indicates that the plat was accepted into the General Land Office records on 18 March 1817 by Josiah Meigs, the Surveyor General of the United States. In 1816 the river was called the Miami River after the Miami Indian Tribe that inhabited the area

The layout and street pattern of Perrysburg as shown in the 1816 plat is still visible today on maps and aerial images. In fact, little has changed. Some lots have been combined, particularly along Louisiana Avenue, which became Perrysburg’s main street and commercial district, and some rail lines and secondary roads have intruded. But for the most part downtown Perrysburg is as Wampler and Brookfield laid it out almost 200 years ago.

To see just how little has changed in the old section of Perrysburg click on the image below to launch a web map that lets you compare 1816 to 2015. Have fun!

Perrysburg Story Map Image JPEG

– Brian

Some GNSS Musings

First things first – GNSS is the new GPS.  Actually, GPS is a subset of GNSS. GPS stands for Global Positioning System, GNSS stands for Global Navigational Satellite System. For decades folks refereed to any and all satellite navigation systems as GPS, and for good reason – the US Global Positioning Satellite system was the only game in town. However, the term ‘GPS’ properly describes just the global positioning system established and maintained by the United States. Now that the Russian GLONASS system is operational, and systems from the European Union, China and perhaps other players (India?) are coming on-line, the term for ALL space-based satellite navigation systems has shifted to GNSS.

OK, now that that’s out of the way.

I spent the last two days in training finally learning how to run Trimble’s TerraSync and Pathfinder Office software.  We’ve had TerraSync and Pathfinder Office software in our office for years, but never got any formal training on how to use either package.  The training was actually very good, and I can see now why a lot of surveying and engineering firms prefer TerraSync over GIS-centric packages like ESRI’s ArcPad.

The class was taught by one of the training and support personnel from our local vendor, NEI, and he did a great job.  Woven throughout the class are discussions about GPS, datums, coordinate systems and issues like unanticipated coordinate system shifts due to improper datum selection or datum mis-matches between the software and virtual reference station (VRS) datums.  We spent a good deal of time in the field actually experiencing the impact of changing datum selections in the software (for example, the shift seen when selecting NAD83 vs. NAD83 HARN).

So this class got me thinking again about GNSS and data quality and accuracy…

In the olden days, like before the turn of the century, these datum shifts generally didn’t concern GIS folks.  The shifts introduced by any datum mis-match were well within most folk’s error budgets.  In most cases we were ecstatic when GPS got us within a few dozen feet of the features we were collecting.  When the accuracy standard of the 1:50,000 topographic map you were using as a base was +/- 50 meters having GPS points a dozen or so feet off was no big deal.  In fact, we were tickled pink to be able to get that level of autonomous GPS accuracy.

Today things are much different. Improved GNSS software, antenna designs, the open availability of reliable GPS and GLONASS signals and the wide availability of GPS augmentation services like WAAS and local virtual reference stations (VRS) means that these systems are capable of sub-meter, often sub-foot, accuracies. That’s just for GIS data collection.  Survey-grade GNSS systems are capable of real-time accuracies to tenths of a foot. Suddenly datum shift errors of even one foot become very, very important for high precision data collection and surveying.

One of the biggest problems people in my line of work face is a general lack of understanding of GNSS in the GIS and civil engineering fields. In particular, many professionals lack up-to-date training and working knowledge of GNSS system capabilities, limitations and application to their line of work.  Evaluating and planning for the potential impact of things like datum shift on GNSS-based surveys or data collection projects is something they can’t comprehend largely because they haven’t been trained on it and, perhaps most important, have’t been forced to consider it when planning or managing a project.

Sadly, I’ve met far too many people with a GISP certificate hanging on their wall who couldn’t tell me the fundamental difference between the NAD 27 and NAD 83 datums, and I have yet to meet a single civil engineer who is not also a licensed surveyor who could explain to me the importance of knowing the datum his or her CAD drawing coordinate system is based on.  Yet both of these groups – the GIS professional and the civil engineer – have a fundamental interest in controlling the overall accuracy and precision of their work.  For the GIS professional it’s a matter reputation and trust.  For the licensed civil engineer it could be a matter of putting his or her work at legal risk.

If you work in the GIS field you can not call yourself a GIS professional unless you have a fundamental understanding of datums, coordinate systems and the importance of applying this knowledge to your workflows.  A strong knowledge of datums and coordinate systems is one of the foundational building blocks of our profession, and since so much of what we do these days is GNSS-based it makes it equally important to have a strong understanding of the impact different datum selections can have on the spatial quality of our data.

I’ve said before in this blog that those GIS ‘professionals’ who consider GIS to be little more than making web maps are headed to extinction. Here in the Atlanta metro area it would take me about an hour to hire a busload of web developers who can make web maps (and this includes time out for a stop at Starbucks). If that bus accidentally rolls into the Chattahoochee River and everybody drowns I can get another busload just as fast. However, the number of GIS professionals I’ve run into who can tell me the anticipated shift in State Plane (NAD83) and State Plane (NAD83 HARN) coordinates wouldn’t fill the first row of that bus.

For the civil engineering community the issue is less obvious but just as critical. GNSS-based surveying and data collection is becoming the norm on many projects. It is faster, cheaper and just as accurate as conventional surveys under the right conditions. This means civil engineers will be incorporating more and more GNSS-based data into their designs and relying on GNSS for jobsite control, machine control and as-built data verification. While the task of establishing project control, setting up survey equipment configurations and managing project survey requirements will fall to the the project surveyor, the project engineer still has overall responsibility for ensuring things are built to design.  If the project stakeout is a few feet out from the design drawings it may not be because the instrument operator has a hangover; it may be because the design work was done in one datum and the GNSS survey unit is set to another. Being able to identify a potential datum shift problem is a key skill for civil engineers working in today’s GNSS-based world.

– Brian

Topographic Instructions of the US Geological Survey

How do you make a map? More precisely, how does one produce a map compiled to specific standards for accuracy, content and style? Does that question keep you up at night? Nah, me either. But it is an interesting question and I’d bet that if you put it to 100 people you’d get 110 answers.

Of course today it’s easy. Nobody really makes a map these days. Most just go to Google Maps on their smartphone or tablet, and these days that’s about all the ‘map’ most people want or need.

But 100 years ago things were much different. Back then there were still vast unmapped areas of the US and it was the responsibility of the US Geological Survey (USGS) to send topographic parties in to map them. This was before the era of cell phones, internet, GPS and even radio communications. Checking with the home office involved the US Mail or, if they were lucky, telegraph. For that reason these parties operated autonomously under the direction of a Party Chief. The Party Chief was part military general, part football coach and part college professor; he ruled with an iron fist and made sure everything was run properly, was responsible for the motivation and morale of his party and was the brains of the outfit. The Party Chief was vested with enormous authority because he had an enormous responsibility – he answered to his regional Chief Geographer for the accuracy and quality of his party’s work.

In 1913 Party Chiefs didn’t go about their work blind. They operated under a very detailed set of instructions and standards laid out in a USGS publication titled Topographic Instructions of the United States Geological Survey.

Topographic Instructions of the USGS

I find this a fascinating manual because it is the only publication I’ve seen that lays out in detail the steps necessary to create a map from scratch. It covers all the processes involved in creating a map to very specific accuracy, content and composition standards. This is, quite literally, the document that defined what we know today as the standard USGS topo quad sheet. Of course the USGS was producing standard topo sheets before this manual was published, but indications are that prior to 1912 the instructions were covered in separate publications and broken out by discipline. This manual brought it all together in a single reference that is remarkably clear and concise for its time, stripped of a lot of the superfluous language that Edwardian-era government functionaries were so fond of using. This is a manual designed to be used in the field by men who have a job to do.

The topics covered include

  • primary and secondary triangulation
  • primary and precise leveling
  • plane table surveying
  • map construction (compilation), drafting and editing
  • instrument care and repair

But beyond the technical, Topographic Instructions of the United States Geological Survey covers detailed administrative instructions to Party Chiefs on topics like crew selection, first aid for pack animals and crew members, how much food to pack, how many fountain pens to bring along, how to set up a base camp, even how to interact with local officials and the press.

It’s a soup-to-nuts manual on how to make a map from scratch.

– Brian

Map Makers At Work

I was going through some photos in my collection for some Facebook friends and ran across a collection of old shots I acquired while assigned to the 320th Engineer Company (Topographic) back in the late 1990s. I say ‘acquired’ because I just happened to find them lying around my office as part of some left over historical records from the old 649th Engineer Battalion (Topographic). All are 1970’s vintage photos that highlight the map making activities of the 649th. The 649th provided comprehensive topographic support – survey, map production & distribution, terrain analysis, and geographic intelligence analysis – to US Army Europe (USAREUR).

In the early 1980’s I was assigned to the 649th at Tompkins Barracks in Schwetizingen, Germany. I served as the commander of one of the terrain analysis detachments. I have a lot of good (and some not-so-good) memories of the 649th and the Soldiers that served in the unit. Fifteen years later I found myself back in Germany. By then the 649th had been deactivated and my unit, the 320th Engineer Company (Topographic), was the last surviving remnant of the 649th. The 320th had received a lot of left over equipment and paperwork from the 649th and one of my duties was to sort through it all to determine what was worth keeping and what could be trashed. During this process I found the photos you see in this post.

All of these photos were rejects, shots the photo editor didn’t think were worthy of using in a presentation. That accounts for a lot of the grease pencil ‘mark outs’ you see on many of the images. The interesting part is that the pictures that made it past the editor and into various publications or presentations are long gone – either packed up with the unit’s archives and locked away in an Army records warehouse or tossed into a trash can. Only the rejects survived to make it to my desk long after the battalion inactivated.

The 649th rarely made a new map from scratch. Most of the work involved updating existing maps or creating specialized overlays (like military operational graphics) to be overprinted onto existing maps. Still, the battalion had all the functional components necessary to create a new map:

  • Topographic and geodetic survey
  • Photomapping and cartography
  • Layout, photolithography and printing press operations

To accomplish these tasks each topographic company within the 649th was divided into three platoons – the Survey Platoon (topographic & geodetic survey), the Photomapping Platoon (photo control, compilation and drafting) and the Reproduction Platoon (layout, photolithography and press).

So let’s take a look at these processes as practiced by Soldiers of the 649th. This isn’t intended to be a comprehensive overview of map making; there are some large gaps in this tale simply because I don’t have any photos depicting specific steps. The real goal here is to highlight the Soldiers and their activities.


 Survey

Each map starts with two things – stereo aerial photography and a topographic survey to ‘tie’ the photos to their location on the face of the earth. Army topographic units relied on US Air Force photomapping squadrons to provide the aerial photography. Once the topographic unit got the aerial photography in hand it was up to the surveyors to go out and collect precise location data for points visible in the photographs – things like road intersections, prominent terrain features or pre-positioned survey point targets.

APPS

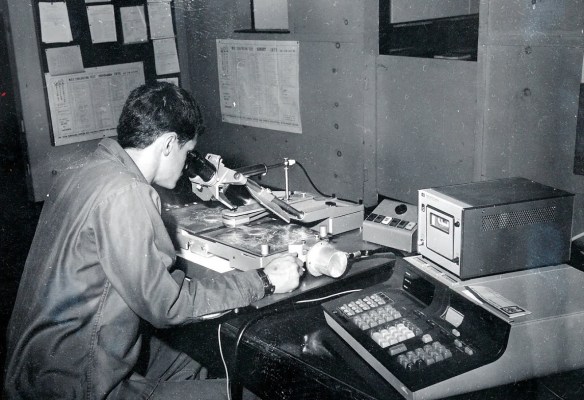
APPS – the Analytical Photogrammetric Positioning System. The APPS permitted surveyors and terrain analysts to precisely determine points on the ground using georeferenced stereo images. The system consisted of a point positioning stereoscope hooked to an early HP desktop computer. Each set of stereo images came with a computer tape that held the ephemeris data for each image. The operator would pick a point on the image in stereo (road intersection, building roof, etc.), tap a foot switch and the computer would print out the point location in latitude and longitude. The APPS was often used by surveyors to collect photo control point coordinates without having to do a formal field survey. For its time this was a revolutionary system.


Survey1

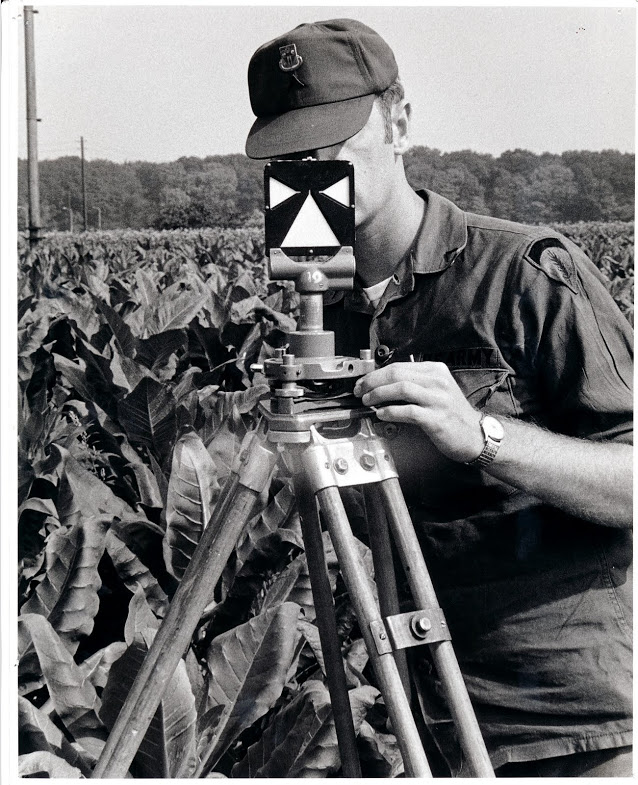
Surveyors ‘turning angles’ with a conventional theodolite (probably a Wild T2). The instrument would be set up over a known control point and used to measure the precise angle to other control points. The operator would call out the angle readings and the Soldier standing behind with the notebook would record the readings and do quick checks of the angle measurements to ensure the readings were accurate.


Survey4

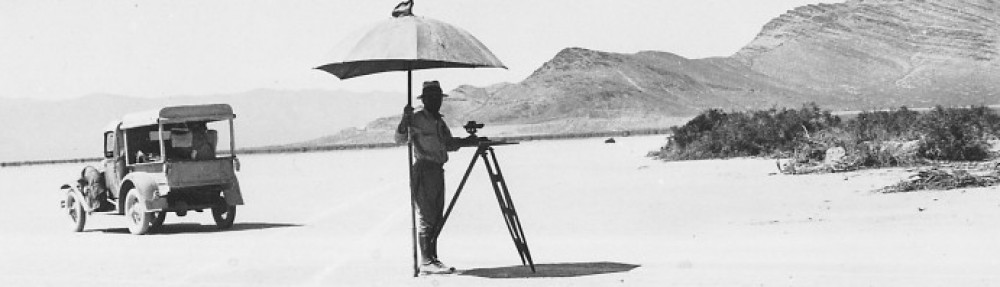
What are the surveyors in the previous photo aiming at? One of these, of course! This is a Wild survey target. It would get set up over a control point that is key to the survey. The theodolite operator adjusts the crosshairs in the theodolite telescope so they bisect the white ‘arms’ and ‘skirt’, of the target, then reads the angle of measurement.


Survey2

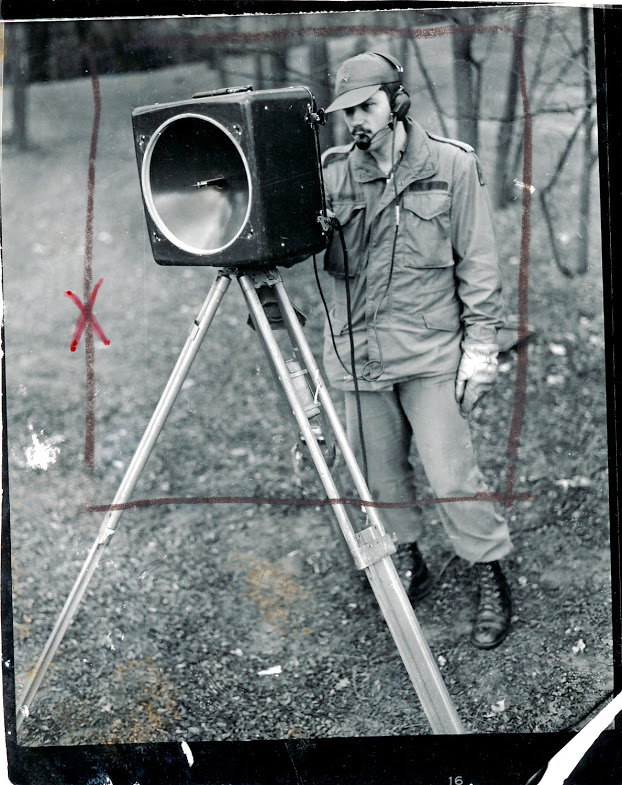
 If a theodolite measures angles how do we measure distances? Well in the 1970’s we used microwave distance measuring equipment called the Tellurometer. The system consisted of a master and a remote unit and measured the time it takes a reflected microwave signal to return the master unit, which was then converted into distance. While I don’t have any hands-on experience using these units, I do remember sitting in on several meetings at the 649th where the surveyors discussed what a headache they were to operate and maintain. By 1980’s standards this was old technology and the units the Army had adopted were becoming maintenance nightmares. But in their time these distance measuring units were a revolutionary time saver. Note the headset the soldier is using. He’s actually talking to the operator at the remote unit via a built-in radio link. The two operators had to continuously coordinate settings and monitor performance during the distance measurement operation.


Survey3

 Here is the back of the Tellurometer unit showing the instrument settings panel.


Calculator

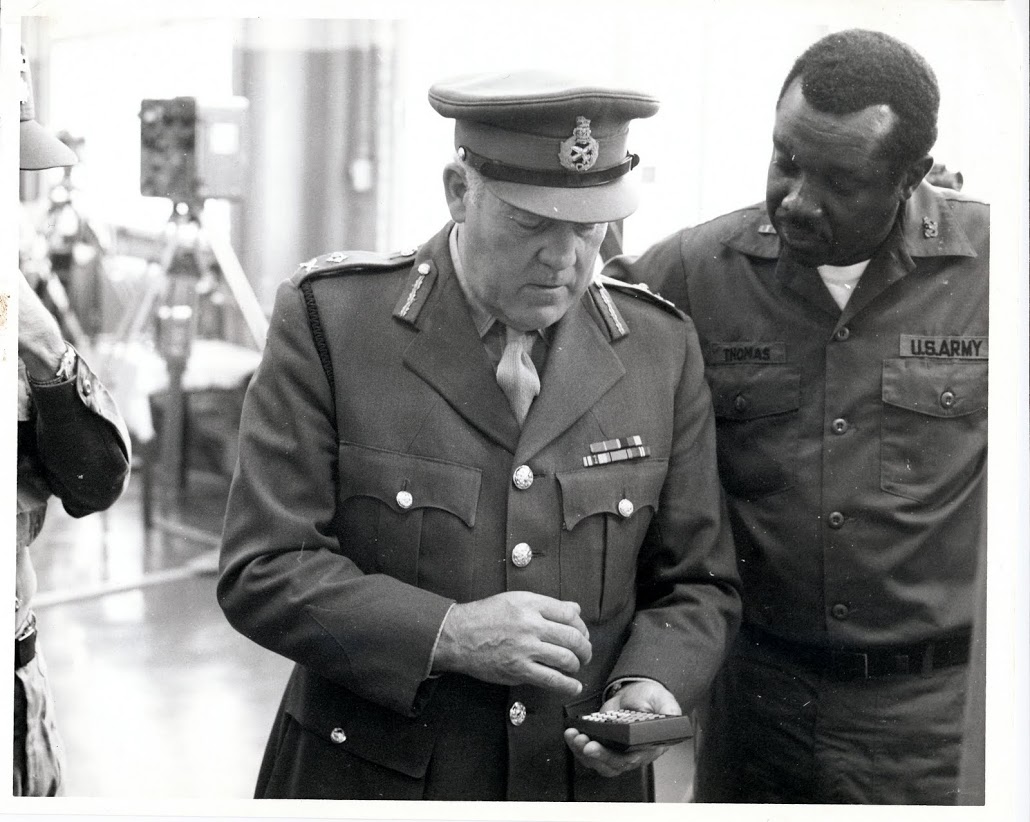
This picture shows the only Soldier in this series that I’ve met. CW2 Thomas (on the right) is demonstrating a new Hewlett-Packard calculator to a visiting British Army officer. CW2 Thomas was one of several survey warrant officers assigned to the 649th. We met at Fort Bragg, North Carolina years after this photo was taken. The Hewlett-Packard (HP) calculator is interesting because they were widely adopted by surveyors due to their rugged construction and advanced functions that were well suited to surveying applications. While I don’t think any HP pocket calculator was ever officially adopted by the Army they were in wide use at the Defense Mapping School where our surveyors were trained. Many of the HP calculators found their way into survey units through local purchase by individual units.


 Photomapping

Photomapping is the process of compiling a topographic map based on information seen in the aerial photographs. Military topographic maps consisted of at least five distinct information layers, each with its own color – cultural features (black), water (blue), vegetation (green), contour lines (brown) and boundaries and built-up areas (red). It is the job of the cartographer to extract each of these information layers from the aerial photography to create a map manuscript. First the cartographers would rectify each aerial photo by removing any tip or tilt in the photo and tying it to the survey control points. Then they would use a device called a multiplex plotter to project the photos in 3D so the cartographer can trace out the key features while viewing the photos in stereo. Once the information is traced onto a manuscript sheet it is passed over to other cartographers who precisely trace out the collected information using the precise symbols we see on the finished map.

Carto3

This photo shows a cartographer setting up a multiplex plotter in preparation for tracing out a new map information layer using photomapping techniques. The multiplex plotter used a stereo pair of aerial photos to project a 3-dimensional image of the terrain onto the white disc or platen of the mutiplex tracing ‘table’ (the device with the white disc seen sitting on the table). The tracing table has a small tracing dot engraved on it that sits directly above a pen holder. The stereo images have been transferred to two small glass diapositive images, and in this picture you see the cartographer holding one of the diapositives in his left hand as he mounts it into the projection stage. The tall ‘can’ in his right hand is the projector assembly that contains the projection lamp, lens assembly and filter. One diapositive is filtered red, the other blue, and the operator wears a pair of glasses with one red and one blue lens (just like the old-time 3D movie glasses), enabling him to see the projected image in stereo.


multiplex plotter

Here we see a cartographer tracing data from the projected image onto a manuscript sheet (usually a sheet of dimensionally stable material like Mylar). You can see entire image projected onto the the table surface just under his forearm, but only the small area projected onto the multiplex table platen is in focus. Engraved on the center of the platen is a small tracing ‘dot’, and mounted directly below it is a tracing pencil. The cartographer carefully adjusts the platen up or down so the tracing dot appears to rest directly on the ground on the stereo image and he then begins to trace out features. He traces one layer type onto each sheet; one sheet for cultural features, one sheet for hydrology (water), one sheet for vegetation etc.


Cartographer

Once a manuscript map layer is drawn it is turned over to other cartographers who carefully trace out the data using approved map symbols and line types. This is called the compilation process, where the cartographers compile the data into standard formats. Map compilation is precise and exacting work, and a cartographer can spend days, sometimes weeks, working on a single sheet.


Carto2

Once each manuscript layer is complete it the information it holds is photographically ‘burned’ or transferred to specially coated plastic called either scribe coat or peel coat (seen above). The words ‘scribe’ and ‘peel’ describe the manner in which the orange coating (seen above) is removed to create clear windows through which a photographic negative can be exposed. Because of the unique nature of the orange coating it completely blocks all the light wavelengths that a film negative is sensitive to, so the orange areas come out black (or unexposed) when the negative is processed. Cartographers use specially designed scribing tools to carefully etch away the areas that represent point or linear features like individual buildings or roads. For larger areas like lakes or farm fields a sheet of peel coat is used, which allows large areas to be carefully cut with a sharp knife or razor blade and peeled away.


Carto4

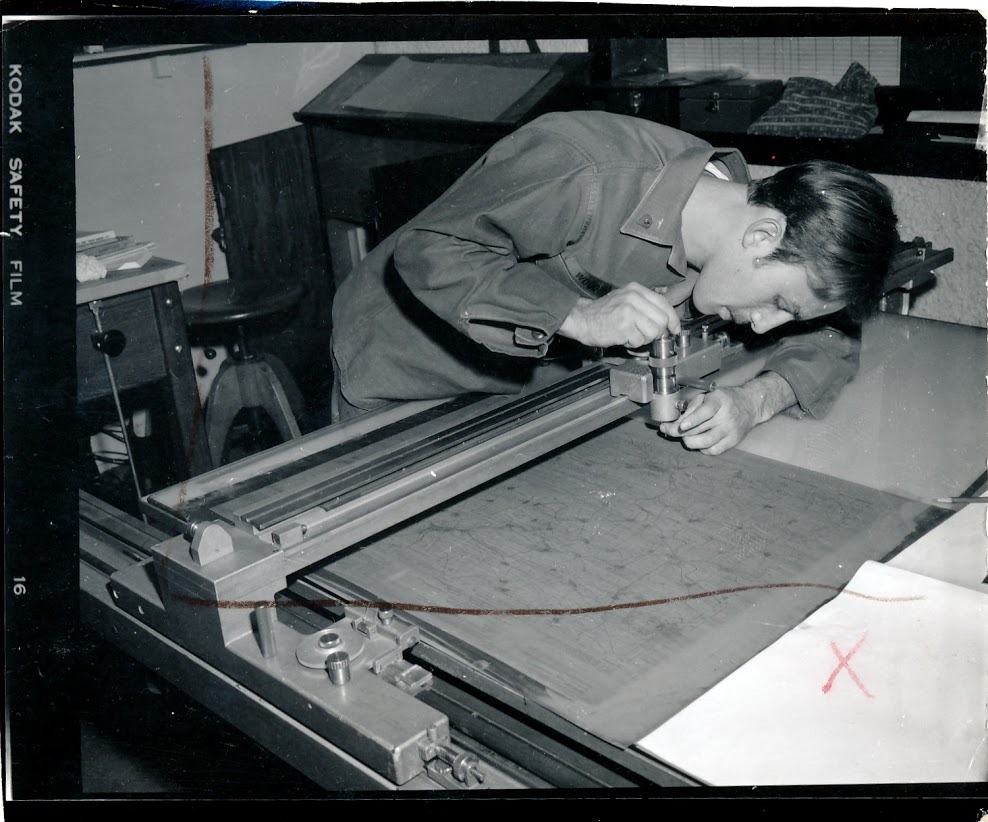
All military maps have grids, and the grid on each map is unique based on the area of the world it covers. Calculating and drawing these grids requires great precision and accuracy since the grids must be exact or the grid coordinates a Soldier derives from an improperly gridded map could be hundreds or thousands of meters off. Here a cartographer is setting up an automated plotting device used to precisely draw the grid for a particular map sheet. Automated tools like this greatly reduced the human error often encountered when drawing grids and speeded up map compilation.


Map Reproduction

Once the cartographers completed the map compilation phase the manuscript sheets were turned over to the Reproduction Platoon for all the steps necessary to print the final map. This normally involved preparing negatives from the scribe and peel coat layers prepared by the Photomapping Platoon, editing and correcting the negatives, making press plates and finally, printing the map.

Layout3

To speed up the map compilation process cartographers made heavy use of pre-printed text. Things like standard place names (cities, towns, etc.), major feature names (rivers, mountains, etc.) and road identification symbols (highways, autobahns, etc.) would all be identified using standarized text that was prepared by the Reproduction Platoon. The cartographer would submit a list of feature names with text style and size requirements and the Reproduction Platoon personnel would provide the information on clear adhesive backed sheets that were created using a photo transfer process. Here we see a Soldier setting up some text as requested on the order sheet attached to the clipboard.


Layout1

One of the last steps in map production is making the negatives from which the press plates are produced. Here we see a Soldier from the Reproduction Platoon doing a final check of a negative before approving it for plate production.


Layout2

The final step before going to press is the plate making or ‘burning’. Press plates are just thin sheets of aluminum specifically sized to fit on a printing press. A map layer negative representing all features of the same color (black, blue, green, brown or red) is placed on top of a press plate that has been coated with a photo sensitive emulsion and the two are placed in a vacuum frame plate maker that uses a high intensity lamp to ‘burn’ or expose the positive image onto the plate. Once the plate is burned it is washed to remove the emulsion and the resulting image is what gets printed on the map. In this photo we see a Soldier from the Reproduction Platoon doing a final cleaning of a press plate before sending it on to the press section.


Press3

The 649th ran a number of presses of different size and capacity, everything from small trailer mounted presses capable of producing only 1:50,000 and 1:250,000 scale maps to large format presses permanently installed in the battalion’s base plant and capable of producing over-sized maps and other geographic products. In this picture we see a press operator from the Reproduction Platoon loading a press plate onto a van mounted Harris offset press.


Press2

Here’s a photo of one of the 649th’s presses installed in its baseplant at Tompkins Barracks in Schwetzingen.


Press1

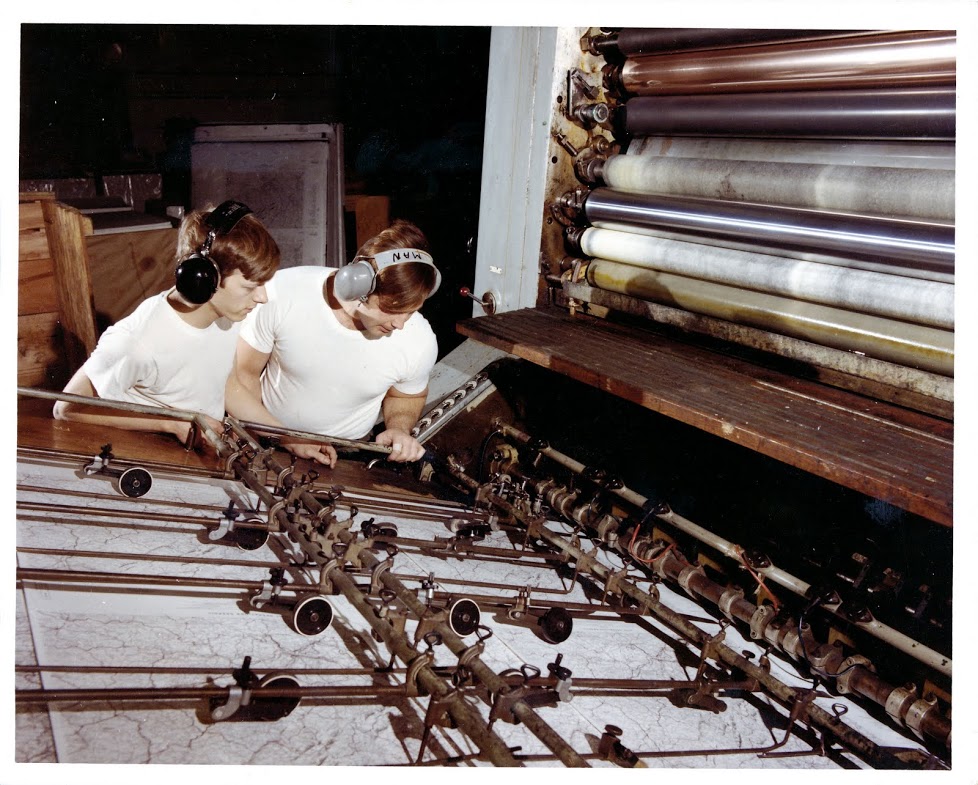
Here’s a photo of the feeder end of another one of the 649th’s large format presses. In this photo it looks like already printed map sheets are being fed back through the press to add another information layer or military overprint.


Map Distro

The very last step in map production is actually map distribution. The 649th also had a Map Distribution Platoon that stocked and distributed the printed maps to units all across Europe. The platoon was responsible for getting the most current maps into the hands of the front line soldier as quickly as possible. The 649th maintained a map distribution warehouse at Tompkins Barracks and at several contingency sites around Europe. The platoon even had specially designed vans that were mobile distribution warehouses that could service forward deployed headquarters. Here we see Soldiers from the Map Distribution Platoon restocking maps at the distribution warehouse at Tompkins Barracks.


And there you have it, Army field map production circa 1970. As I mentioned in the start of this post I’ve taken a lot of liberties by overly simplifying the map making process with the intent of highlighting the Soldiers and activities of the 649th. If any readers recognize any of the Soldiers shown in these photos (or if you happen to be one of these Soldiers) I’d love to hear from you. You can either add a comment to this post or contact me at oldtopographer(at)gmail.com. If I’ve made any factual errors in the map making process, or if I’ve mis-identified any of the process shown in these photos please leave a comment here and I’ll make the necessary corrections. Thanks, and I hope you’ve enjoyed this trip down memory lane!

– Brian

Surveying The Land

In 1785, the Congress of the Confederation passed the Land Ordnance of 1785 in an effort to sell lands acquired through treaty or were relinquished by individual states in return for other concessions. (Remember your history here – the Constitutional Convention didn’t meet until 1787, and before that the states operated under a loose confederation with a weak, barely functioning central government.) In 1785 the federal government was about broke, was facing crushing debt and needed to do something fast to generate cash. The only resource they had was land – lots of land. It was a happy coincidence that settlers needed land – lots of land. The growing nation was spilling over the Appalachians and into the the new regions of the ‘Northwest Territories’ – today’s Western Pennsylvania, Ohio, Indiana, Illinois, Michigan, Wisconsin and Minnesota. Most were squatters, occupying land they didn’t have title to. Heck, nobody had clear title to the land because it hadn’t been mapped, surveyed and divided into salable parcels or lots. Not even Congress clearly understood what they had.

This is where the Land Ordnance of 1785 came in. The Ordnance established the mechanism by which the land was to be surveyed and divided into logical parcels that made for easy identification and sale. Known as the Public Land Survey System (PLSS), it established the township & range survey system that started on the western bank of the Ohio River in 1785 and ended up extending all the way to the Pacific Ocean. In September 1785 surveyor Thomas Hutchins walked down to the bank of the Ohio River opposite Georgetown, Pennsylvania, drove a stake in the ground and established the origin point, or point of beginning, for the survey system that would end up defining the geographic fabric of a nation. Hutchins moved west into the Ohio territory on to lay out the first township & range sections in what is known as the Seven Ranges survey.

Seven Ranges

To facilitate the sale of this land Congress established the General Land Office (GLO) in 1812. For over 120 years the GLO managed the sale or transfer of public lands to millions of homesteaders, farmers, ranchers and commercial interests. The GLO conducted or oversaw the largest public land survey program in history, and its achievement remains unmatched today. Modern surveyors still refer to original GLO survey records because they are, in a very real sense, the foundational documents for much of this country.

In 1946 the GLO was merged with another federal agency to become the Bureau of Land Management (BLM). In the mid-1980s the BLM made a series of short films discussing its history. Below is an informative piece from that series discussing the development and use of the township & range survey system. Enjoy!

– Brian

What’s Happening in 1926?

Why, it’s the Sesquicentennial International Exposition!

The exposition was a bust, going bankrupt in 1927.  But at least one Federal government agency got in on the celebration.  The General Land Office of the Department of the Interior issued this neat postcard:

I’m guessing the General Land Office had an exhibit in the ‘U.S. Gov – Transportation, Machinery, Mines & Metallurgy’ exhibit space near the south side of the exposition.

What was the General Land Office (GLO) and what did it do?  The GLO was formed in 1812 with the mission of selling federal lands to private individuals.  But the GLO was more than just a sales agency.  They first had to survey and subdivide federal lands into logical and easy to identify and register parcels.  Using the township & range system first used in 1785 by Thomas Hutchins to lay out the Seven Ranges area of eastern Ohio, the GLO conducted the largest land survey program in history, surveying, registering and selling billions of acres of public land stretching from the Ohio border to Washington State.

In 1946 the GLO was merged with other Department of the Interior agencies to for the Bureau of Land Management.  The BLM still conducts extensive land surveys, but certainly nothing like what took place during the heyday of the General Land Office in the late 1800s.

By the way, the popular saying ‘land office business’, which that indicates a flurry of business activity (“He’s doing a land-office business!”), popped up in the mid-1800s and refers to the often frenetic activity that surrounded local GLO offices as settlers scrambled to register and pay for their land claims.  Selling land was a booming business in the 1800’s, and nobody sold more of it than the GLO!

Brian

A Survey Problem

Or maybe not.  Here’s an interesting postcard I recently picked up –

It’s unused, so there’s no postmark on the back that I can use to nail down the date, but we can glean a few clues from the photo itself.  First, quite obviously it’s a WWII-era photo.  Probably early WWII because the rifles at stack arms are the M1903 Springfield.  Since Camp Roberts opened in March, 1941 and the US Army had effectively replaced the venerable ’03 Springfield with the new M1 Garand by early 1942 I’ll date this photo to mid-to-late 1941.

Next, I don’t think these Soldiers are ‘surveying’.  Since Camp Roberts was primarily an Infantry and Artillery training center my guess is that these are soldiers taking a class in Field Artillery plotting using plane tables.  Plane tables were a common item in Field Artillery battery TOEs, intended to be used as a field expedient plotting table.  I have one in my collection with the case stenciled ‘HQ FDC’ – Headquarters Fire Direction Center.  I have no idea which headquarters or which fire direction center, but clearly it was a piece of Field Artillery equipment (and identical to the plane tables used by Engineer survey units).  Another clue that this is a Field Artillery class is the use of large artillery plotting protractors.  You can just make them out on the plane tables in the foreground – large semi-circular protractors with a rotating plotting ruler mounted at the center.  Plus, there are no alidades visible, a key piece of equipment for any survey plane table work.

Yup, these are Field Artillery soldiers learning how to plot artillery fire.  But I will forgive the publisher’s gaffe because it’s still a neat picture of Army training in early WWII. The stacked rifles, the ammunition belts with canteens hanging from the tree, the Soldiers working the problems at the plotting boards while their classmates sit behind them studying their manuals.  I love how the plane tables are arrayed in an arc to best utilize the shade from the tree.  Looking at aerial photos of Camp Roberts on Google I’m guessing these guys found one of the very few shade trees available in this part of California.